

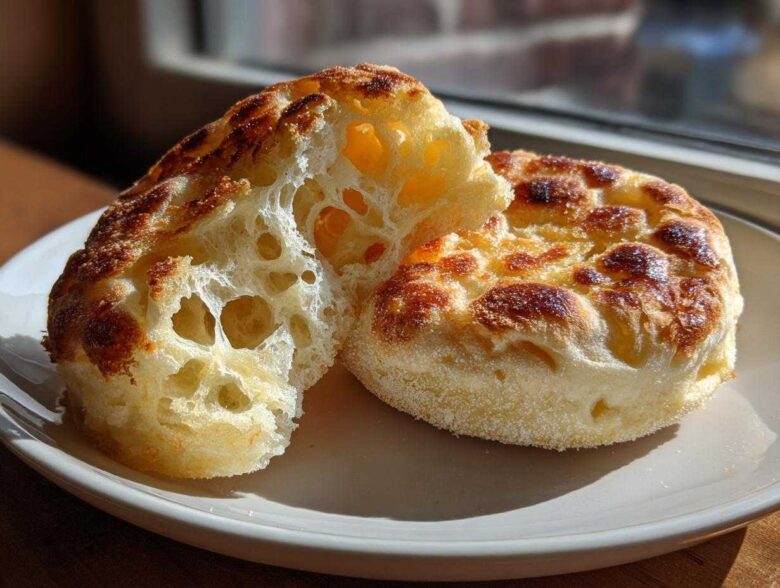
Okay, listen up, because I have to tell you something: I finally nailed it. After so many flat, dense, sad attempts at bakery goods, I cracked the code for the most glorious homemade english muffins you can imagine. Forget those sad, spongy things from the grocery store! I’m talking about that dreamy texture—the soft, chewy inside packed with those beautiful, legendary nooks and crannies.
Seriously, the secret is keeping the dough wet and letting the stove do all the hard work for you. This is a simple, no-knead method, which means less work and way more reward. I spent years trying to get that perfect contrast between the golden, slightly crisp exterior and the open interior, and trust me, using the griddle is the only way to go. When you split the first one open and see those holes begging for melted butter? Pure magic. You absolutely have to try this
breakfast baking breakthrough!
Why These Are the Best Homemade English Muffins From Scratch
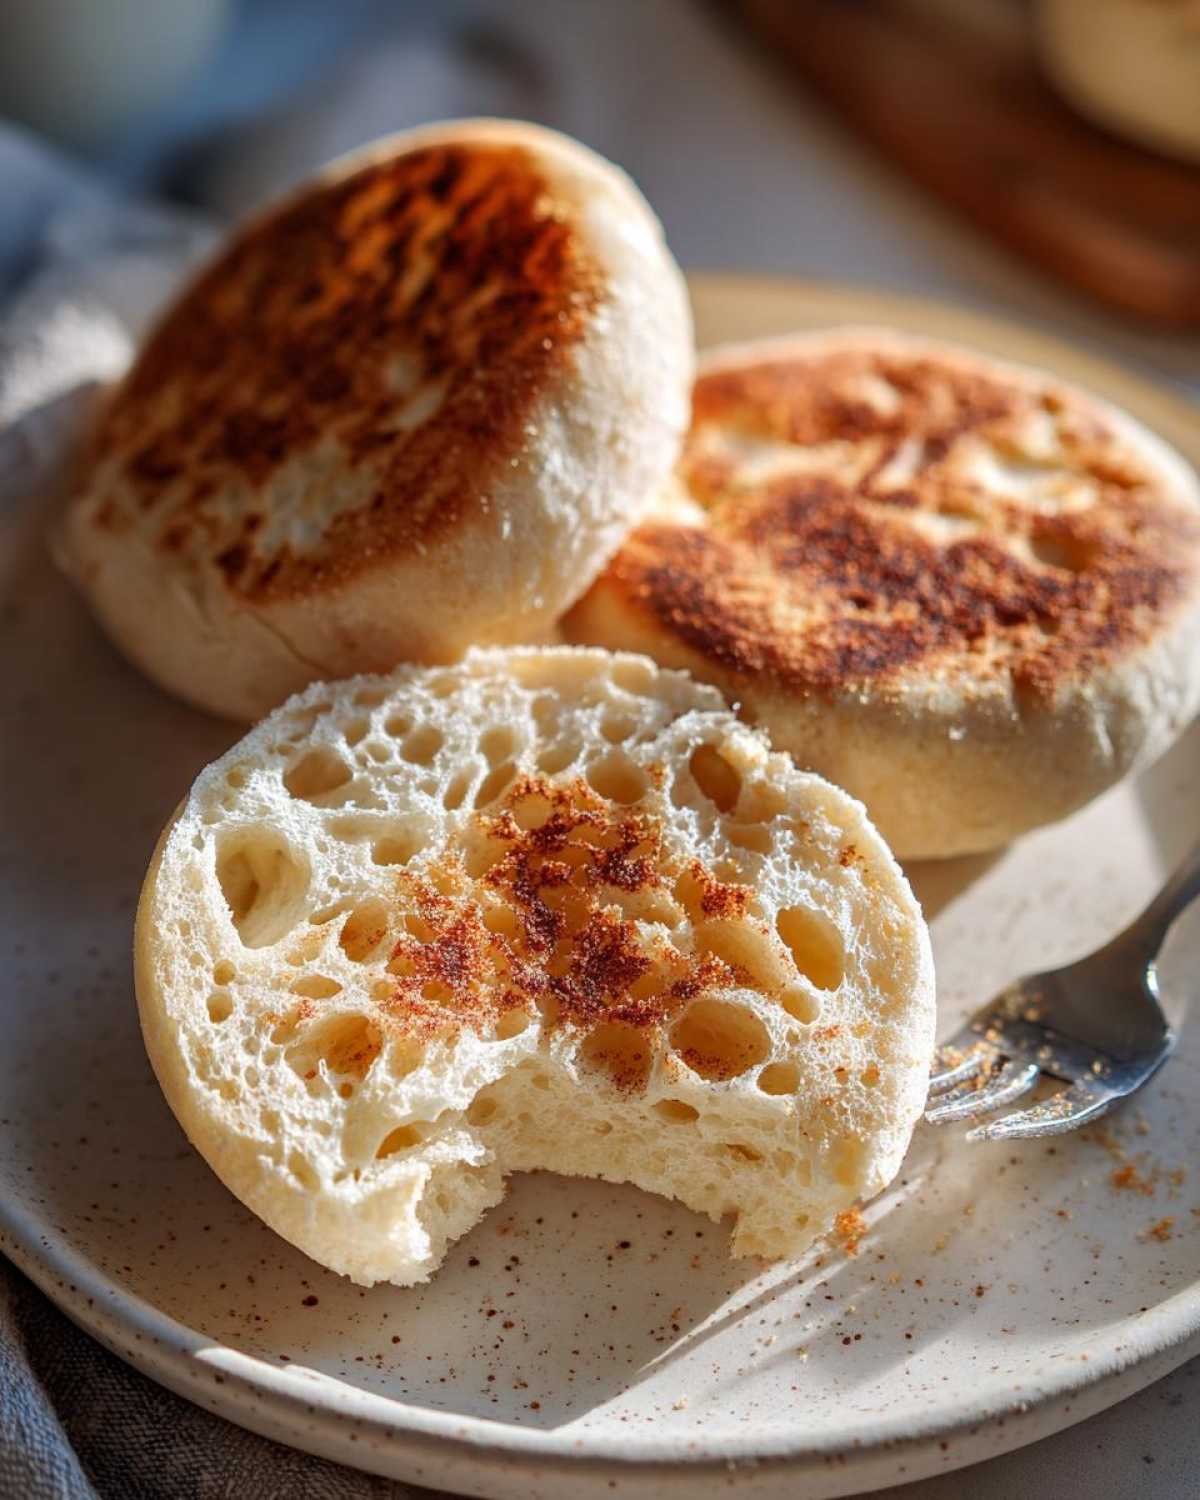
If you ask me, the difference between good and great homemade english muffins is all about the texture. We’re chasing that authentic, chewy, fluffy homemade bread feel that you only usually find at a classic diner. This easy english muffin recipe is designed specifically for that!
Achieving Perfect Nooks and Crannies
That famous interior? It’s all down to two things: our incredibly wet dough—no kneading required, thank goodness—and cooking them slowly on the stove. That gentle heat on the griddle cooks the inside slowly, forcing those lovely open pockets to form. And here’s my biggest pro tip: never slice them with a knife! Always use a fork to gently pry them open to preserve every single hole.
Quick English Muffin Recipe Overview
Honestly, you can make english muffins at home faster than you think. We mix it up wet, let it puff up while we go do something else, pat it out gently, cut the rounds, and then we cook them right there on the skillet—hello, stovetop english muffins! It’s far less fussy than trying to bake a traditional loaf, which is why this is my go-to for easy breakfast baking.
Ingredients for Classic Homemade English Muffins
When you’re making something special like best english muffins from scratch, you have to pay attention to the details of your ingredients. Don’t worry, though; the list isn’t long! The magic here is in the quality and the proportions, especially that milk temperature. Trust me when I say don’t rush the yeast activation stage!
- 1 1/2 cups warm milk (aim for 105-115 degrees F—too hot and you kill the yeast!)
- 2 1/4 teaspoons active dry yeast
- 1 tablespoon granulated sugar
- 1 teaspoon salt
- 3 1/2 cups all-purpose flour, plus more for dusting
- 2 tablespoons unsalted butter, melted
- Cornmeal, for dusting (this is non-negotiable, folks!)
Ingredient Notes and Substitutions for Homemade English Muffins
Let’s talk yeast first. Since this is technically a no knead bread recipe, we need that yeast happy right from the start. Make sure your warm milk is actually warm, not straight from the tap hot, or you’ll have sad, dead yeast. I use active dry yeast, and proofing it with sugar first is mandatory!
And that cornmeal? It’s our best friend when we put these on the griddle. It keeps the bottoms from sticking, but it also gives that signature slightly gritty, wonderful crust. As for flour, all-purpose works great for that perfect chewy homemade muffin texture, but if you want an even chewier result, you can replace about half a cup with bread flour. Just remember that this dough really loves to be wet, so add flour slowly!
How to Prepare Easy English Muffin Recipe Instructions
Alright, let’s get down to the actual baking! I know instructions can sometimes look scary, but I promise you, this process is incredibly straightforward, especially since there’s absolutely no kneading involved. We are aiming for a super soft, almost batter-like dough that does all the rising work on its own. Keep your surface floured and your heat low, and you’ll have these ready for your next
breakfast feast.
Activating the Yeast and Mixing the Dough
First things first: wake up that yeast! Pour your warm milk—remember, 105 to 115 degrees is the sweet spot—mix in the sugar and yeast, and just let it sit for about five minutes. If it gets foamy, great news, your yeast is alive and ready for action! Next, stir in the salt and melted butter. Now, start adding that flour gradually. You need to mix until you have a soft, sticky dough. Don’t worry if it feels too wet compared to normal bread dough; that’s exactly what we want for amazing texture!
Cover that bowl—plastic wrap works perfectly—and find the warmest spot in your kitchen. You need to let this dough rise for a good hour to an hour and a half. It should at least double in size. This is where the magic happens, building up all those air pockets for your final nooks and crannies.
Shaping and Resting the Homemade English Muffins
Once doubled, gently turn that fluffy dough out onto a surface you’ve dusted well with flour. Remember, we aren’t knocking the air out, so pat it down softly or roll it gently until it’s about half an inch thick. Grab your 3-inch cutter and start stamping out your rounds. Collect the scraps—don’t knead them back together—just give them a gentle press and cut a few more.
Here’s the next critical step for this homemade breakfast idea: we need resting time after cutting. Dust a baking sheet really generously with cornmeal, place your cut muffins on top, leave space between them, cover them lightly, and let them rest again for 30 minutes. This short rest relaxes the gluten before they hit the heat.
Mastering the Stovetop English Muffins Cooking Method
Time to cook! Grab your heavy skillet or griddle. Turn the heat down to medium-low—and I mean low. You must heat this completely dry; no oil, no butter! If your pan smokes, it’s too hot, and you’ll burn the outside before the inside develops. Carefully lay the muffins onto the warm, dry surface, giving them room to breathe.
Cook them slowly for about 8 to 12 minutes on the first side until they look beautifully golden. Flip them over gently and cook the second side until it matches. If they are browning too fast, dial that heat down immediately! Some folks like to finish them in a 350-degree oven for five minutes after griddling, but if you cook them slow enough, you can skip that step entirely. They should sound a little hollow when lightly tapped.
Tips for Success Making English Muffins at Home
Getting those beautiful, open interiors—the hallmark of great homemade english muffins—really comes down to respecting the dough and how you cook them. Don’t rush anything! Low and slow is the name of the game when you’re using the griddle, so if you see them darkening too fast, definitely back off the heat. It’s easy to burn that beautiful crust before the center is cooked through, and that’s just heartbreaking.
My number one tip, which I mentioned before but bears repeating because it’s so important, is how you split them open. If you grab a knife, you slice right through all the beautiful air pockets you worked so hard to create. Instead, let them cool slightly, grab a fork, and poke gently all the way around the seam. Then, you can pull the halves apart cleanly. That technique is the secret to showcasing those incredible nooks and crannies! This attention to technique is what separates a decent breakfast muffin recipe from something truly bakery-style.
Serving Suggestions for Your Buttery English Muffins
Toast these beauties up and get ready, because they are begging for toppings! If you’ve mastered the art of the nooks and crannies, you know they soak up melted butter like nothing else. But don’t stop there! These make the best base for any morning creation. Think beyond simple jam; these are perfect for deluxe breakfast sandwiches. My favorite way to dress them up is for breakfast pizza, or even piling on smashed avocado and a perfectly fried egg, something like my avocado toast but kicked up a notch.
Seriously, the texture holds up so well, which makes them ideal for hearty stacking. Whether you’re making simple english muffin sandwich ideas or going all-out brunch style, these buttery english muffins will shine. You won’t believe how sturdy these are once they come off that griddle!
Storage and Reheating Instructions for Homemade Bread
Since these homemade english muffins are fresh bread with no preservatives, keeping them perfect is important! If you plan on eating them within three days, just put the cooled muffins into an airtight container at room temperature. They stay surprisingly soft that way.
If you make a big batch—and trust me, you will want to—freezing is your friend. Let them cool completely, then wrap them tightly in plastic wrap, maybe add a layer of foil, and freeze them for up to two months. To bring them back to life? Don’t microwave them!
The only way to reheat them is to split them open and toss them right into the toaster or under the broiler. That gentle heat from the toaster restores that slightly crisp exterior we worked so hard for while warming up that soft interior. It’s the best way to enjoy your griddle cooked bread!
Frequently Asked Questions About Homemade English Muffins
I get so many great questions once people start trying to make english muffins at home! It’s natural to have a few worries when you’re dealing with a sticky, wet dough for the first time, especially when you expect those perfect open pores. Don’t fret—we can solve most issues easily!
Can I make sourdough english muffins using this recipe?
Oh, that’s a great question! While this particular recipe is designed to be super quick english muffin recipe using commercial yeast, you absolutely can adapt it for sourdough. It just won’t be quick! If you want to switch to using your starter instead of the yeast, you’ll need to feed that starter appropriately and plan for fermentation times of six hours or even overnight. You’ll also have to adjust the liquid ratios because sourdough starters can vary wildly in hydration. Stick to this yeast version for ease, but if you’re feeling adventurous, go for it!
Why are my homemade english muffins flat instead of fluffy?
This is almost always a proofing issue, I see this happen sometimes! If your muffins end up flat, it usually means one of two things happened. Either the dough didn’t get warm enough during its first rise and didn’t double in volume, or, more likely, you were too rough when you turned the dough out to cut the rounds. You have to handle that dough like a delicate cloud to keep the gas bubbles in there. Don’t punch it down hard; just gently coax it into shape!
Can I use a cast iron pan instead of a griddle for these stovetop english muffins?
Yes, you totally can use cast iron! In fact, I love cast iron for this because it holds heat so evenly, which is perfect for achieving that uniform golden color on your stovetop english muffins. The most important part, no matter what you use, is that you have to keep the heat low. Cast iron retains heat really well, so be extra careful it doesn’t get scorching hot. We are gently toasting them, not searing a steak on there! If I ever want to make something spicy alongside my muffins, I often use my cast iron pan for appetizers later in the week.
Estimated Nutritional Data for Classic English Muffins
I always like to give you guys a little peek at the numbers, though you know I’m way more concerned with how they taste than the macros! Here is the estimated nutritional breakdown per muffin based on the recipe details. Remember, this is just a ballpark estimate based on standard ingredients used in the recipe. Baking is both an art and a science, and brands can change those figures!
- Serving Size: 1 muffin
- Calories: 180
- Sugar: 2g
- Sodium: 250mg
- Fat: 3g
- Carbohydrates: 34g
- Protein: 6g
If you’re curious about how I manage my kitchen philosophy, you can always check out my About Us page. But really, when you’re making something this incredible from scratch, just pop one in the toaster, slather it with butter, and enjoy the moment. That’s the real nutrition here!
Share Your Homemade English Muffins Creations
Now that you have officially mastered the art of making incredible homemade english muffins—complete with those perfect nooks and crannies—I absolutely need to see what you come up with! Seriously, seeing your golden-brown creations makes my entire week. Tag me on social media when you make your first batch; seeing them fresh off the griddle is the best part of my job!
If this easy english muffin recipe changed the way you think about breakfast, please consider leaving a rating right below. Five stars is always lovely, but honest feedback helps everyone reading the comments section. I read every single comment, and I’m always here if you need last-minute help figuring out why your dough was feeling sticky or if you need storage tips. You can always reach out directly through my contact page too, but the comments are the best place to celebrate this win!
Go ahead, split one open, slather it with butter, and savor that perfect chewiness. You earned it!
PrintClassic Homemade English Muffins with Nooks and Crannies

Make soft, chewy English muffins from scratch using this straightforward recipe. These muffins cook on the stovetop to achieve the perfect texture and famous interior holes.
- Prep Time: 20 minutes
- Cook Time: 25 minutes
- Total Time: 1 hour 55 minutes
- Yield: 10 to 12 muffins
- Category: Breakfast
- Method: Stovetop Griddling
- Cuisine: American
- Diet: Vegetarian
Ingredients
- 1 1/2 cups warm milk (about 105-115 degrees F)
- 2 1/4 teaspoons active dry yeast
- 1 tablespoon granulated sugar
- 1 teaspoon salt
- 3 1/2 cups all-purpose flour, plus more for dusting
- 2 tablespoons unsalted butter, melted
- Cornmeal, for dusting
Instructions
- Combine the warm milk, yeast, and sugar in a large bowl. Let stand for 5 minutes until foamy.
- Stir in the salt and melted butter into the yeast mixture.
- Gradually add the flour, mixing until a soft, slightly sticky dough forms. You may not need all the flour.
- Cover the bowl with plastic wrap and let the dough rise in a warm place for 1 to 1 1/2 hours, or until doubled in size. This is a wet dough, so no kneading is required.
- Lightly dust a clean surface with flour. Gently turn the dough out onto the surface. Pat or lightly roll the dough to about 1/2 inch thickness.
- Use a 3-inch round cutter to cut out the muffins. Gather the scraps, gently re-pat, and cut out remaining muffins.
- Generously dust a baking sheet or large tray with cornmeal. Place the cut muffins on the cornmeal-dusted surface, leaving space between them.
- Cover the muffins loosely with plastic wrap and let them rest for 30 minutes.
- Heat a dry, heavy-bottomed skillet or griddle over medium-low heat. Do not add oil or butter.
- Carefully place the muffins onto the warm griddle, leaving space between them. Cook for 8 to 12 minutes per side, until golden brown. If they brown too quickly, reduce the heat.
- Remove the muffins from the griddle and set them aside. If you prefer a softer exterior, you can finish them in a 350 degree F oven for 5 minutes, but this is optional.
- To serve, split the muffins using a fork around the edges to preserve the nooks and crannies, then toast them.
Notes
- For the best ‘nooks and crannies,’ use a fork to split the muffins instead of slicing them with a knife.
- Cooking on medium-low heat is critical; high heat burns the outside before the inside cooks through.
- Store cooled, uncut muffins in an airtight container at room temperature for up to 3 days.
Nutrition
- Serving Size: 1 muffin
- Calories: 180
- Sugar: 2
- Sodium: 250
- Fat: 3
- Saturated Fat: 2
- Unsaturated Fat: 1
- Trans Fat: 0
- Carbohydrates: 34
- Fiber: 2
- Protein: 6
- Cholesterol: 10